这几天回顾了下 Service,查了一些国内外相应的文档,发现其实大多数国内的文档都只是简单的讲下 Service 的两种启动方式而已,并不是很全,所以决定写一下这方面的文档供参考。本文主要参考 google 的 Service 官方文档。
什么是Service
它是一个在后台(即不提供用户界面)执行长时间操作的应用组件。服务可由其他应用组件启动,即使用户切换到其他应用,服务仍将在后台继续运行。 此外,可以将组件绑定到服务来与之进行交互,并可以执行进程间通信 (IPC)。 例如,服务可以在后台处理网络事务、播放音乐,执行文件 I/O 或与内容提供程序交互。
Service 的3种类型
- Foreground(前台服务)
前台服务是用来执行用户可以感知的操作,如音乐播放器会用前台服务来播放音乐。前台服务必须要展示一个通知。即使用户不与该应用进行交互,前台服务依然会继续运行。 - Background(后台服务)
执行用户不会直接感知到的操作,如应用需要压缩手机的存储空间。
Note:如果你的 targets API >= 26,当应用不在前台时,系统会对后台服务进行限制。这时,你可以用 scheduled job 来代替后台服务。
- Bound(绑定服务)
当组件使用 bindService() 方法启动 Service 时,Service 就与该组件绑定了。绑定服务提供了客户端服务器接口来允许组件与服务进行交互,发送请求,获取返回值,升值可以通过 IPC 来跨进程进行这些操作。绑定服务仅仅只在另一个组件与之绑定期间运行。多个组件可以同时绑定一个 Service,当所有与之绑定的 Service 都解绑时,Service 才会被 destroy。
尽管上面将启动和绑定服务分开来讲,一个服务既可以被绑定也可以被启动。是启动还是绑定取决于你实现 onStartCommand()(启动)还是 onBind()(绑定)回调。
Caution:如果服务运行在主线程中,它是不会创建自己的线程,如果不指定的话也不会在单独的进程中运行。如果服务需要执行 CPU密集型工作或者是阻塞性工作,譬如后台播放音乐,网络请求,你就需要在服务里创建一个子线程来完成工作,否则会造成 ANR。
在 Manifest 中声明 Service
Service 需要像 Activity 那样在 AndroidManifest 中声明:
<manifest ... >
  ...
  <application ... >
	  //将你创建的 Service 声明一下
      <service android:name=".ExampleService" />
      ...
  </application>
</manifest>
你可以通过 service 配置来查看更多的关于 service 在 manifest 中的声明信息。 android:name 是唯一必须的属性,用来指定 service 的名字。当你应用发布后,不要改变服务的名字。
为了确保 app 的安全性,启动 Service 时使用一个明确的 intent(创建 intent 的时候,直接指定要启动的目标的 name),并且不要设置 intent filters。使用隐含的 intent(通过 action 启动目标) 启动 service 会造成安全隐患,因为你不确定响应这个 intent 的 service 是哪个,而且用户也无法看到哪个服务启动了。从 Android 5.0 开始,如果你使用一个隐含 intent 调用 bindService() 系统会抛出异常。
你可以通过指定 android:exported=false 属性来确保 service 只能被你的 app 启动。由于用户是可以在手机上看到哪些服务正在运行并且可以手动停止服务,你最好添加 android:description 属性到
Creating a started service(创建一个启动服务)
started service 也就是另一个组建通过 startService() 启动的服务。它会调用 Service 中的 onStartCommand()。启动后,它的生命周期与启动它的组件是相互独立的,即使启动它的组件销毁了,它也会一直在后台运行。这时,服务自身可以通过调用 stopSlef()或者另一个组建通过调用 stopService() 来停止。
通过 startService(intent) 启动 Service 后,Service 在 onStartCommand() 中接收该 intent。
你可以继承下面2个类来创建 Service:
Service
它是所有服务的父类。如果你继承这个类,注意要创建线程来执行任务。如果你的服务要执行多线程,可以继承它来实现。 为了与下面的 IntentService 对比,我们也创建一个一次只能执行一个任务的服务:
public class HelloService extends Service {
  private Looper mServiceLooper;
  private ServiceHandler mServiceHandler;

  // Handler that receives messages from the thread
  private final class ServiceHandler extends Handler {
      public ServiceHandler(Looper looper) {
          super(looper);
      }
      @Override
      public void handleMessage(Message msg) {
          // Normally we would do some work here, like download a file.
          // For our sample, we just sleep for 5 seconds.
          try {
              Thread.sleep(5000);
          } catch (InterruptedException e) {
              // Restore interrupt status.
              Thread.currentThread().interrupt();
          }
          // Stop the service using the startId, so that we don't stop
          // the service in the middle of handling another job
          stopSelf(msg.arg1);
      }
  }

  @Override
  public void onCreate() {
    // Start up the thread running the service.  Note that we create a
    // separate thread because the service normally runs in the process's
    // main thread, which we don't want to block.  We also make it
    // background priority so CPU-intensive work will not disrupt our UI.
    HandlerThread thread = new HandlerThread("ServiceStartArguments",
            Process.THREAD_PRIORITY_BACKGROUND);
    thread.start();

    // Get the HandlerThread's Looper and use it for our Handler
    mServiceLooper = thread.getLooper();
    mServiceHandler = new ServiceHandler(mServiceLooper);
  }

  @Override
  public int onStartCommand(Intent intent, int flags, int startId) {
      Toast.makeText(this, "service starting", Toast.LENGTH_SHORT).show();

      // For each start request, send a message to start a job and deliver the
      // start ID so we know which request we're stopping when we finish the job
      Message msg = mServiceHandler.obtainMessage();
      msg.arg1 = startId;
      mServiceHandler.sendMessage(msg);

      // If we get killed, after returning from here, restart
      return START_STICKY;
  }

  @Override
  public IBinder onBind(Intent intent) {
      // We don't provide binding, so return null
      return null;
  }

  @Override
  public void onDestroy() {
    Toast.makeText(this, "service done", Toast.LENGTH_SHORT).show();
  }
}
在服务启动的时候会调用 onCreate ,我们在里面创建一个 HandlerThread 用于开启一个线程,目的是将它的 Looper 传给一个 Handler。这样,通过该 handler 发送的消息都是在这个 HandlerThread 中处理的。
调用 startService 后,onCreate 执行完后会执行到 onStartCommand() 这时会利用 onCreate 中创建好的 Handler 来发送消息来让 handler 做任务。如果服务启动后,多次调用 startService 不会再调用 onCreate(),但是会多次调用 onStartCommand() 方法来达到创建多个任务的目的。
我们可以不用 Handler,直接在里面开线程执行任务,这样每次调用 startService 就会调用 onStartCommand(),从而达到同时执行多个任务的目的。
onStartCommand() 返回值是用来告诉系统当服务被杀死后该如何继续这个任务。它有3个值:
START_NOT_STICKY:
如果服务在执行完 onStartComman() 后被系统杀掉,不会重新创建服务,除非有待处理的 intent。它可以避免在非必要的情况下运行服务。
START_STICKY:
如果服务在执行完 onStartComman() 后被系统杀掉,则重新创建服务并调用 onStartCommand(),但不会处理最后的一个 intent。系统会调用 onStartCommand(),里面的 intent 参数为空,除非有待处理的 intent。这适用于不执行命令但会无限期运行并等待任务的媒体播放器之类的服务。
START_REDELIVER_INTENT:
如果服务在执行完 onStartComman() 后被系统杀掉,则重新创建服务并调用 onStartCommand()。系统会调用 onStartCommand(),传入最后一个 intent,待处理的 intent 会依次处理。这适用于文件下载这类需要立刻恢复的服务。
IntentService
它是 Service 的子类,内部使用了一个 worker 线程来依次处理所有的请求。如果你不需要同时执行多个请求的话,IntentService 无疑是最好的选择。当你通过 startService 启动该 Service 后,它会在 onStartCommand() 中创建一个 worker 线程来执行所有的 intent。它会维护一个工作队列,每次会传递一个 intent 到 onhandleIntent() 方法中,你只需要实现 onHandleIntent() 方法即可,无需担心多线程问题。当执行玩所有的请求后,会自动通知服务,而不需要调用 stopSelf() 方法。
public class HelloIntentService extends IntentService {

  /**
   * A constructor is required, and must call the super IntentService(String)
   * constructor with a name for the worker thread.
   */
  public HelloIntentService() {
      super("HelloIntentService");
  }

  /**
   * The IntentService calls this method from the default worker thread with
   * the intent that started the service. When this method returns, IntentService
   * stops the service, as appropriate.
   */
  @Override
  protected void onHandleIntent(Intent intent) {
      // Normally we would do some work here, like download a file.
      // For our sample, we just sleep for 5 seconds.
      try {
          Thread.sleep(5000);
      } catch (InterruptedException e) {
          // Restore interrupt status.
          Thread.currentThread().interrupt();
      }
  }
}
可以看到,只需要有一个构造函数,然后实现 onHandleIntent() 方法即可。
启动服务
你可以传一个 Intent 给 startService() 或 startForegroundService() 来启动服务。系统将会调用 onStartCommand() 方法并将 Intent 传给他。
Intent intent = new Intent(this, HelloService.class);
startService(intent);
如果该服务不提供绑定的话,该 intent 是唯一能让启动 Service 的组件和 Service 进行通信的模式。如果你想让 Service 发送一个返回值,你可以通过 PendingIntent getBroadcast (Context context, int requestCode, Intent intent, int flags)创建一个 PendingIntent,然后在 intent 里传给 Service。那么 Service 就能通过 broadcast 来发送结果。
停止服务
停止服务只需要调用 stopSelf() 或 stopService() 即可。如果服务并发处理了多个任务(即多次调用了 onStartCommand()),你不应该在处理完请求后直接停止服务,因为你可能还会有新的请求。你应该通过 stopSelf(int) 方法来停止对应的请求,这个 int 值就是所启动的请求的 id(即 onStartCommand() 中的 startId 参数),那么当服务在调用 stopSelf(int) 之前如果接收到新的请求,id 就会不匹配,那么就不会停止服务。
创建一个绑定服务
绑定服务在客户端服务器模型中,承担的是服务器的角色。客户端通过调用 bindService() 方法来将之与服务绑定起来,它通常不允许组件通过调用 startService() 来启动。
当你需要与 Service 进行交互,或者是想通过 IPC 暴露功能给其余的应用时就需要创建绑定服务。
创建绑定服务,你需要实现 onBind() 回调来返回一个 IBinder,它定义了与 Service 进行交互的接口。组件调用 bindService() 来获取这个借口从而调用 Service 中的方法。这个 Service 仅仅服务于绑定它的组件,所以当没有组件绑定它时,系统会将该服务销毁。你无需使用 stopSelf(), stopService 方法来停止服务。
多个客户端可以同时绑定到一个服务。当一个客户端不再与 Service 进行交互时,调用 unbindService() 来解绑。当没有客户端与服务绑定的时候,系统会销毁 Service。
给用户发送通知
服务可以使用 Toast 或状态栏通知来给用户发送通知。通常在文件下载之类的后台任务完成后会使用状态栏通知来告知用户,用户点击通知可以启动一个 Activity。
在前台运行服务
前台服务是用户可以感知的服务,并且在内存不足时,系统也不会将之杀掉。前台服务必须要提供一个通知,当服务停止或者从前台移除后才能被干掉。譬如播放音乐就需要用前台服务,因为用户可以确切的知道它的操作。状态栏上的通知可以展示当前播放的音乐,并且点击后可以打开 Activity 让用户与播放器进行交互。
通过调用 startForground() 来启动一个前台服务,它里面有两个参数,一个是通知的 id,一个是通知。这个通知必须有一个优先级,如 PRIORITY_LOW。
Intent notificationIntent = new Intent(this, ExampleActivity.class);
PendingIntent pendingIntent =
        PendingIntent.getActivity(this, 0, notificationIntent, 0);

Notification notification =
          new Notification.Builder(this, CHANNEL_DEFAULT_IMPORTANCE)
    .setContentTitle(getText(R.string.notification_title))
    .setContentText(getText(R.string.notification_message))
    .setSmallIcon(R.drawable.icon)
    .setContentIntent(pendingIntent)
    .setTicker(getText(R.string.ticker_text))
    .build();

//id 必须不为0
startForeground(ONGOING_NOTIFICATION_ID, notification);
你可以调用 stopForground()来将服务从前台移除。它里面的一个 boolean 参数表示是否将状态栏的通知也一并移除掉。这个方法不会停止服务,如果你在它依然运行在前台的时候调用这个方法,通知也会被移除掉。
实现生命周期的回调
类似 Activity,你也可以实现 service 生命周期回调方法来检测 service 状态的变化。
public class ExampleService extends Service {
    int mStartMode;       // indicates how to behave if the service is killed
    IBinder mBinder;      // interface for clients that bind
    boolean mAllowRebind; // indicates whether onRebind should be used

    @Override
    public void onCreate() {
        // The service is being created
    }
    @Override
    public int onStartCommand(Intent intent, int flags, int startId) {
        // The service is starting, due to a call to startService()
        return mStartMode;
    }
    @Override
    public IBinder onBind(Intent intent) {
        // A client is binding to the service with bindService()
        return mBinder;
    }
    @Override
    public boolean onUnbind(Intent intent) {
        // All clients have unbound with unbindService()
        return mAllowRebind;
    }
    @Override
    public void onRebind(Intent intent) {
        // A client is binding to the service with bindService(),
        // after onUnbind() has already been called
    }
    @Override
    public void onDestroy() {
        // The service is no longer used and is being destroyed
    }
}
我们来看看 service 的生命周期:
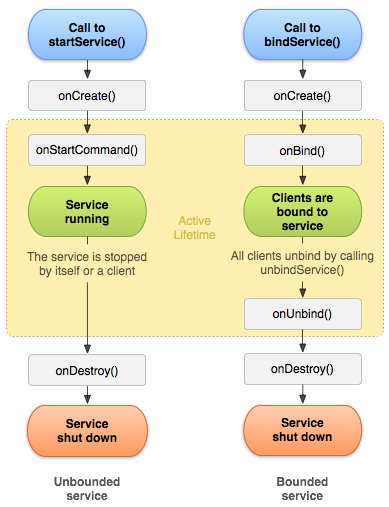
左边是使用 startService() 启动的服务的生命周期,右边则是通过 bindService 启动的服务的生命周期。虽然上图将 startService() 与 bindService() 启动的服务分离开了,但是无论服务是如何启动的,它都允许客户端再去绑定它。即通过 startService() 启动服务,调用 onStartCommand() 后,再通过 bindService() 来绑定服务,该服务依然能调用 onBind()。